Position for drainage different areas of lungs
Subject: Fundamentals of Nursing

Overview
Positions for Drainage Different Areas of Lungs
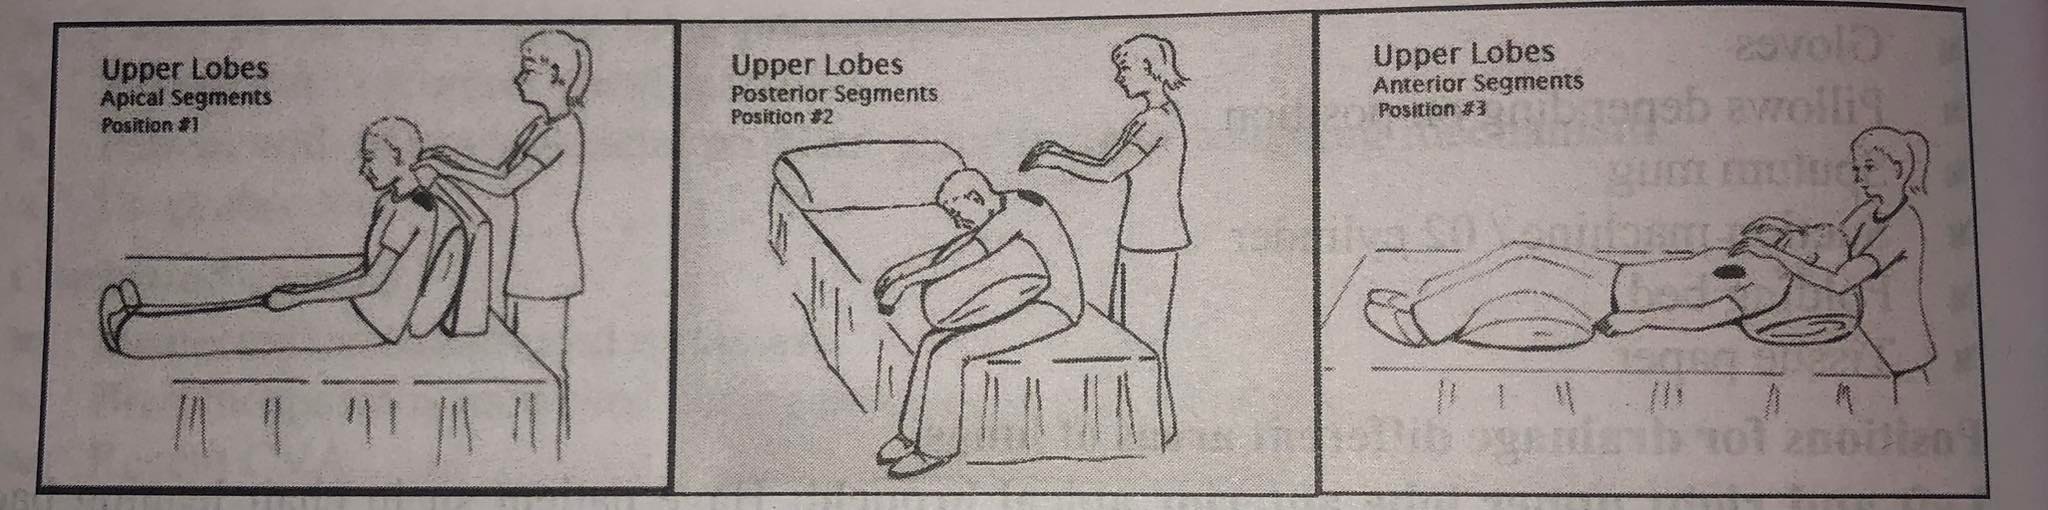
Left and Right Upper Lobe Anterior Apical Bronchi: Have patient sit in chair leaning back. Percuss with cupped hands and vibrate with heels of hands at shoulders and with fingers over collarbone. Both sides can be done at the same time. Note body posture and arm position of nurse. Nurse's back is kept straight and elbows and knees are slightly flexed.
Left and Right Upper Lobes Posterior Apical Bronchi: Have patient sit in chair leaning forward on pillow or cardiac table. Percuss and vibrate with hands on either side of the upper spine, can do both sides at the same time.
Right and Left Anterior Upper Lobe Bronchi: Have patient lie flat on back with small pillow under knees. Percuss and vibrate just below clavicle on either side on sternum.
Left Upper Lobe Lingular Bronchus: Have patient lie on right side with arm over head in Trendelenburg position with foot of bed raised 30 cm. Place pillow behind back and roll patient one-fourth on to pillow. Percuss and vibrate lateral to left nipple below axilla.
Right Middle Lobe Bronchus: Have patient lie on left side, raise foot of bed to 30 cm. Place pillow behind back and roll patient one-fourth turned on to pillow. Percuss and vibrate area of right nipple below axilla.
Left and Right Anterior Lower Lobe Bronchi: Have patient lie on back in Trendelenburg position, with foot of bed elevated 45-50 cm. Have knees bent on pillow. Percuss and vibrate over lower anterior ribs on both sides.
Right Lower Lobe Lateral Bronchus: Have patient lie on left side in Trendelenburg position with foot of bed raised to 45 to 50 cm. Percuss and vibrate right side of the chest below scapula posterior to midaxillary line.
Left Lower Lateral Bronchus: Have patient lie on right side in Trendelenburg position with foot of bed raised to 45 to 50 cm. Percuss and vibrate left side of the chest below scapula posterior to midaxillary line.
Right and Left Lower Lobe Superior Bronchi: Have patient lie flat on stomach with pillow under stomach. Percuss and vibrate below scapulae on either side of spine.
Left and Right Posterior Basal Bronchi: Have patient lie on stomach in Trendelenburg position with foot of bed elevated 40 to 50 cm. Percuss and vibrate over posterior ribs on either side of spine.
Upper Lobes
- Anterior Segments: Place the patient in semi fowler's position in chair or bed.
- Posterior Segments: Have the patient sit in chair leaning forward on pillow or cardiac table.
- Lateral Segment: Place the patient in lateral position elevated to about 45° first to one side and to other side. When out of bed, ask the patient to lean on arm, resting on chair or table for support.
Middle Lobes
Anterior Segment (right side): Have the patient lie on left side, raise foot to bed 30 cm. Place pillow behind back and roll the patient one-fourth turned on to pillow.
Posterior Segment: Place the patient in prone with chest and abdomen elevated.
Lower lobes
Anterior Segments: Place the patient in supine, trendelenburg with hips elevated with pillows so that hips are higher than shoulders.
Posterior Segments: Place the patient prone, trendelenburg or hips elevated with pillow so ub that hips are higher than shoulders. αυτά νη gel adol
Lateral Segments: Place the patient in right side lying trendelenburg for left lung and left side lying trendelenburg for right lung or hips elevated with pillows to keep hips higher than shoulders.
Procedure
| S.N. | Nursing Action | Rationale |
| 1 | Identify the patient and check the physician's order for specific instructions for postural drainage. | Ensures that right procedure is done on the right patient. |
| 2 | Explain the procedure to the patient. | Promotes client's cooperation. |
| 3 | Close door and pull the screen. | Maintain the patient's privacy. |
| 4 | Wash hands. | Reduces the transmission of microorganisms. |
| 5 | Assess for possible impairment of airway clearance. | Certain conditions may place the client at risk for impaired airway clearance. |
| 6 |
Identify signs and symptoms that indicate need to perform postural drainage such as changes in X-ray film, consistent with atelectesis, pneumonia, bronchiectasis, ineffective coughing with thick sticky tenacious sputum and abnormal breath sounds such as wheezing, cracking and gurgling. |
x-ray, and sign and symptoms indicate accumulation pulmonary secretions. |
| 7 | Identify which bronchial segments needs to be drained by reviewing chest x-ray reports. Auscultate over all lung fields for wheezes, crackles and gurgles, palpate over all lung fields for crepitus, fremitus and chest expansion. | Area can be identified by presence of early inspiratory crackles and gurgles. |
| 8 | Select congested areas to be drained based on assessment of all lung fields, clinical data and chest x-ray. | Treatment must be individualized to treat specific areas involved. |
| 9 | Place the patient in position to drain congested areas. Help the patient assume position as needed. | Specific positions are selected drain each area involved. |
| 10 | Maintain posture for 10-15 minutes. During 10 to 15 minutes of drainage in each posture, perform chest percussion and vibration over areas being drained. | These maneuvers provide mechanical forces that aid in mobilization of airway secretions. |
| 11 | Encourage diaphragmatic breathing throughout postural drainage. | This helps widen airways so secretions can be drained. |
| 12 | After 10 to 15 minutes of drainage in first posture, have the patient sit up and cough. Save expectorated secretions in a clear container. If the patient cannot cough suctioning is to be performed. | Coughing is most effective when the client is sitting up and leaning forward. |
| 13 | Provide rest to the patient if necessary. | Short rest between postures can prevent fatigue. |
| 14 | Repeat the procedure until congested areas selected have been drained. Each treatment should not exceed 20 to 30 minutes. | Postural drainage is used only to drain area involved and is based on individual assessment. |
| 15 | Give the patient sips of water. | Keeps the mouth moist and aids in expectoration of secretions. |
| 16 | Make the patient comfortable and ask to rest flat for ten to fifteen minutes before allowing sitting or getting out of bed. | Promotes comfort. |
| 17 | Auscultate the patient's lungs' sound. |
Evaluates the effectiveness of therapy. |
| 18 | Help and advice for mouth wash. | Removes the bad taste of sputum in the mouth. |
| 19 |
Dispose the sputum container in infectious waste container. Replace the articles. Wash hands. |
Reduces the transmission of microorganisms. |
| 20 | Record in nurse's notes baseline and post therapy assessment of chest, frequency and duration of treatment, postures used and bronchial segments drained; cough effectiveness, need for suctioning, colour, amount and consistency of sputum, hemoptysis or other unexpected outcome, patient's tolerance and reactions. | Helps to evaluate outcomes and need for changes in therapy. |
Percussion (Clapping)
Chest percussion involves striking the chest wall over the area being drained. Percussing lung areas involves the use of cupped palm to loosen pulmonary secretions so that hey can be expectorated with ease. Percussing with the hand held in a rigid dome-shaped position, the area over the lung lobes to be drained in struck in rhythmic pattern. Typically, each area is percussed for 30 to 60 seconds several times a day. Percussion helps in dislodging mucous plugs and mobilizes secretions into the main stem bronchi and trachea.
Procedure
- Assess the patient's health condition before starting the procedure.
- Place the patient in the prescribed postural drainage position.
- Instruct the patient to perform diaphragmatic breathing. This method of breathing helps the patient to relax and widens airways.
- Cover the area with clothes to reduce discomfort.
- Clap with cupped hands over chest wall for 30 to 60 seconds in each lung area. Percuss from:
- Lower the ribs to the shoulder in the back.
- Lower the ribs to the top of the chest in front.
Cupping is never done on bare skin or performed over surgical incisions, below the ribs, or over spine, liver, kidney, spleen, breast, clavicle or sternum because of the danger of tissue damage.
Vibration
Vibration is a technique of applying manual compression and tremor to the chest wall during the exhalation phase of respiration. This helps to increase the velocity of the air expired from the small airway, thus freeing the mucous.
Procedure
- With the fingers of both hands pressed together or side by side, place the hands, palms down, on the area of the chest that needs to be drained.
- Ask the patient to practice abdominal breathing by taking deep breaths and gently exhaling through pursed lips.
- Over the affected area, stack one hand on top of the other or lay a hand on each side of the rib cage.
- While exhaling, contract all of the hand and arm muscles and moderately vibrate the hand, particularly the heels.
- As the patient inhales, release the pressure on the chest.
- After three or four vibrations, the patient should be encouraged to cough by engaging the abdominal muscles.
- Multiple times, let the sufferer relax.
- Use a stethoscope to listen for variations in breath sounds.
- For five exhalations, vibrate each affected lung region. Encourage the patient to cough and expectorate sputum into the sputum cup after 3–4 vibrations.
Special Considerations While Doing Chest Physiotherapy
- According to the client's condition, adjust chest physiotherapy for maximum effectiveness and safety. For instance, if necessary, start or enhance the delivery of additional oxygen. Reduce the length of the sessions if the client becomes fatigued rapidly during therapy since weariness causes shallow breathing and more hypoxic.
- Keep the client getting chest physical therapy adequately hydrated to prevent mucus dehydration and to encourage simpler secretion mobilization. To avoid nausea, vomiting, and aspiration of food or vomitus, avoid practicing postural drainage right before or within 12 hours following meals.
- Any adjunct therapy (such as intermittent positive-pressure breathing, aerosol, or nebulizer treatments, for example) should come before chest physiotherapy since it can trigger bronchospasm.
- Avoid striking the spine or internal organs by not striking over the liver, kidneys, spleen, or spine. Avoid striking the client's breasts or naked flesh with percussion. Place a thin towel over the chest wall or tap on soft clothing (but not over buttons, snaps, or zippers). Keep in mind to take off any jewelry that could hurt or scratch the client.
- Before surgery, teach the client how to cough and how to take deep breaths so that they can practice them while they are pain-free and more alert.
- After surgery, splint the client's incision with your hands or, if possible, show them how to do it themselves to lessen discomfort when they cough.
Complications of Chest Physiotherapy
- During postural drainage in head-down positions, pressure on the diaphragm by abdominal contents can impair respiratory excursion and lead to hypoxia or orthostatic hypotension.
- The head-down position also may lead to increased intracranial pressure, which precludes the use of chest physiotherapy in a client with acute neurologic impairment.
- Vigorous percussion or vibration can cause rib fracture, especially in the client with osteoporosis. In an emphysematous client with blebs, coughing could lead to pneumothorax.
- Aspiration of secretions in other lung regions.
Things to remember
© 2021 Saralmind. All Rights Reserved.
 Login with google