Frost Bite
Subject: Fundamentals of Nursing

Overview
Frost Bite

Extreme cold can damage skin and other tissues, resulting in frostbite. A section of the body developing this disease results from prolonged exposure to cold or snow. Usually, tissues furthest from the heart are impacted by frostbite. Additionally, it happens in tissues that are most vulnerable to cold. The ears, nose, chin, fingers, and toes are the body parts that are most frequently impacted. It is a condition where local tissue is harmed by prolonged surface blood vessel constriction brought on by exposure to extremely low temperatures. Blood vessels contract to maintain body temperature at -15°C or lower. Tissue harm takes place if this condition continues. To prevent tissue damage that is permanent, caution should be used.
Sign and Symptoms
- The impacted area may feel chilly, uncomfortable, or stiff.
- Early on, there may be numbness and a blanching sensation.
- Skin imperfections
- slack skin
- Burning/tingling sensation
In severe cases:
- Loss of sensation and loss of movement of the part may be present in the later stage.
- Gangrene may develop in the last stage, which requires operation or amputation of the part.
First Aid Management for Frost Bite
- Take the victim away from the cold weather and provide warmth by giving extra linens and hot drinks.
- Remove tight clothing, if necessary rings, gloves, socks and shoes gently.
- Treat hypothermia first. Cover the person well.
- Warm the affected parts by using extra linens, blankets or sleeping bags e.g. if the affected part is the face, chin, ear or nose, cover the face with dry gloved hands until the color and sensation is restored. If it is hand or feet, wrap them in a warm blanket or sleeping bag.
- Do not use heat, hot water bottle, fire or friction as the lack of sensation on the affected part it may result the burn.
- Transfer the victim for medical treatment as quickly as possible.
Precautions
- Do not rub the area.
- Do not burst blisters.
- Do not heat the part with fire or hot water bottles.
Prevention
- Wear adequate clothing/wear several layers of clothing. Use gloves, socks, ear covering hat, before exposure to cold.
- If possible, do not expose to extreme cold, wet clothes, chilly wind.
- Leave as little skin exposed as possible.
- Get enough food and rest.
- Avoid alcohol immediately before exposure to cold.
- Avoid cotton clothing.
Foreign Object in the Eyes
Any object that lodges itself in the eye is called a foreign object of the eye. Foreign bodies like dust, sand particles, iron, coal, ashes, insects, small pieces of glass, usually enter into the conjunctival sac or may adhere to cornea: particles may penetrate the chambers of the eye.
Sign and Symptoms
- Scratchy feeling
- Irritation and discomfort
- Sensitive to light (photophobia)
- Tearing
Foreign body in the eye can be classified as:
- Free floating on the surface of the eye.
- Adherent to or embedded on the conjunctiva or corneal part of eye.
- Penetrating the eyeball.
First Aid Management
- Wash hands before helping the victim.
- Seat the person in a chair, facing the light area.
- Gently examine the eye.
- Pull lower eyelid downward.
- Ask the person to look upward.
- Then hold upper eyelid while person looks down.
- If object is floating remove it with a narrow moist swab or try flushing it out.
- If object cannot be removed, refer to doctor.
- If object is embedded, do not manipulate it.
- Cover the eyes with soft and clean pad and tape it.
- Don't rub the eye.
- Refer to hospital.
Foreign Body in the Nose
Children and mentally handicapped are likely to put foreign body (corn, peas, bean, grain, etc.) into the nostril.
Sign and Symptoms
- Sneezing
- Irritation and discomfort
- There may be redness and swelling
- Pain
First Aid Management
- A few drops of mineral oil may be dropped to relief irritation and swelling.
- Do not sneeze forcefully in effort to take out the foreign body.
- Do not blow nose with one nostril.
- Do not try to remove by unskilled personnel.
- Refer victim to hospital.
Foreign Bodies in the Ear
Any outside object lodged inside ear canal. Or Solid substances like pea, grain, corn, bean can enter the air and observe moisture swell up and obstruct the air. Insects like flies, ant, bed bugs can also enter ear. The cases of foreign bodies in ear occur generally in children.
First Aid Management
- If object is protruding, use tweezers to remove.
- If object is small, shake head with ear facing downward.
- If it is insect turn head to place affected ear upward.
- Place few drops of mineral oil/baby oil inside ear.
- Use oil only in case of insect; otherwise it may lead to swelling.
- Seek medical help if required.
Cardio Pulmonary Resuscitation
Cardiopulmonary resuscitation (CPR) - also known as BLS (Basic Life Support): is the procedure of maintaining artificial respiration and artificial circulation in a mammal that has gone into cardiac arrest through repeating cycles of chest compressions and ventilations. It is intended to maintain adequate oxygenation and circulation of critical body tissues, particularly those of the central nervous system (brain and spinal cord) and heart so that advanced life support procedures can restore the circulatory system to a functional state. Cardio means heart, pulmonary pertains to lungs, and resuscitation means to revive from death or unconsciousness. Cardio pulmonary resuscitation is an emergency procedure for restoration of cardiac and respiratory functions after cardiac arrest.
Purposes
- To provide oxygen to the brain heart and other vital organs until appropriate definitive medical treatment can restore normal heart and ventilator function.
- To establish effective ventilation and circulation.
- To present irreversible brain damage from anoxia.
- To provide basic life support till advanced life support arrives.
Indications
- CPR is indicated for people who are not breathing and are unable to maintain adequate circulation.
- Respiratory arrest resulting from drowning, stroke, foreign body, airway obstruction, smoke inhalation, drug overdose; suffocation, myocardial infarction and coma of any cause leading to airway obstruction.
- Cardiac arrest.
- Immediate loss of consciousness.
- Absence of palpable carotid and femoral pulse.
Articles
- Cardiac board
- Suction apparatus
- Oxygen supply
- A box containing
- Ambu bag, mask, connecting tube, CPR model
- A tray containing
- Sterile endotracheal tube (2.5 to 9.5mm)
- Laryngescope with 0, 1, 2 size tongue blades
- Stilet
- Extra batteries
- Magill forceps
- Adhesive tape Scissors
- Airway - oral, nasal
- Syringe 3cc, 5cc, 10cc
- Needles 23g, 22g
- Intracardiac needle 20g, 22g, 6-8 cm length
- Elastoplast bandage
- Gloves
- Tongue depressor
- Cardiac monitors
- Emergency drugs
- Tracheotomy set
ABC of CPR
Airway
- Open the airway.
- Establish the patient is airway by suctioning oropharynx with catheter.
Breathing
- Establish breathing by artificial ventilation.
- Place ambu bag on mouth and nose and connect to 100 percent oxygen. Select ET tube using the formula.
Age in years + 4/4
Calculate the size of ET tube approximately as diameter of the client's little finger. The ET tube is inserted to a distance calculated using the formula e.g. ET tube size x 3 cm.
Circulation
- Initiate cardiac compression.
Procedure
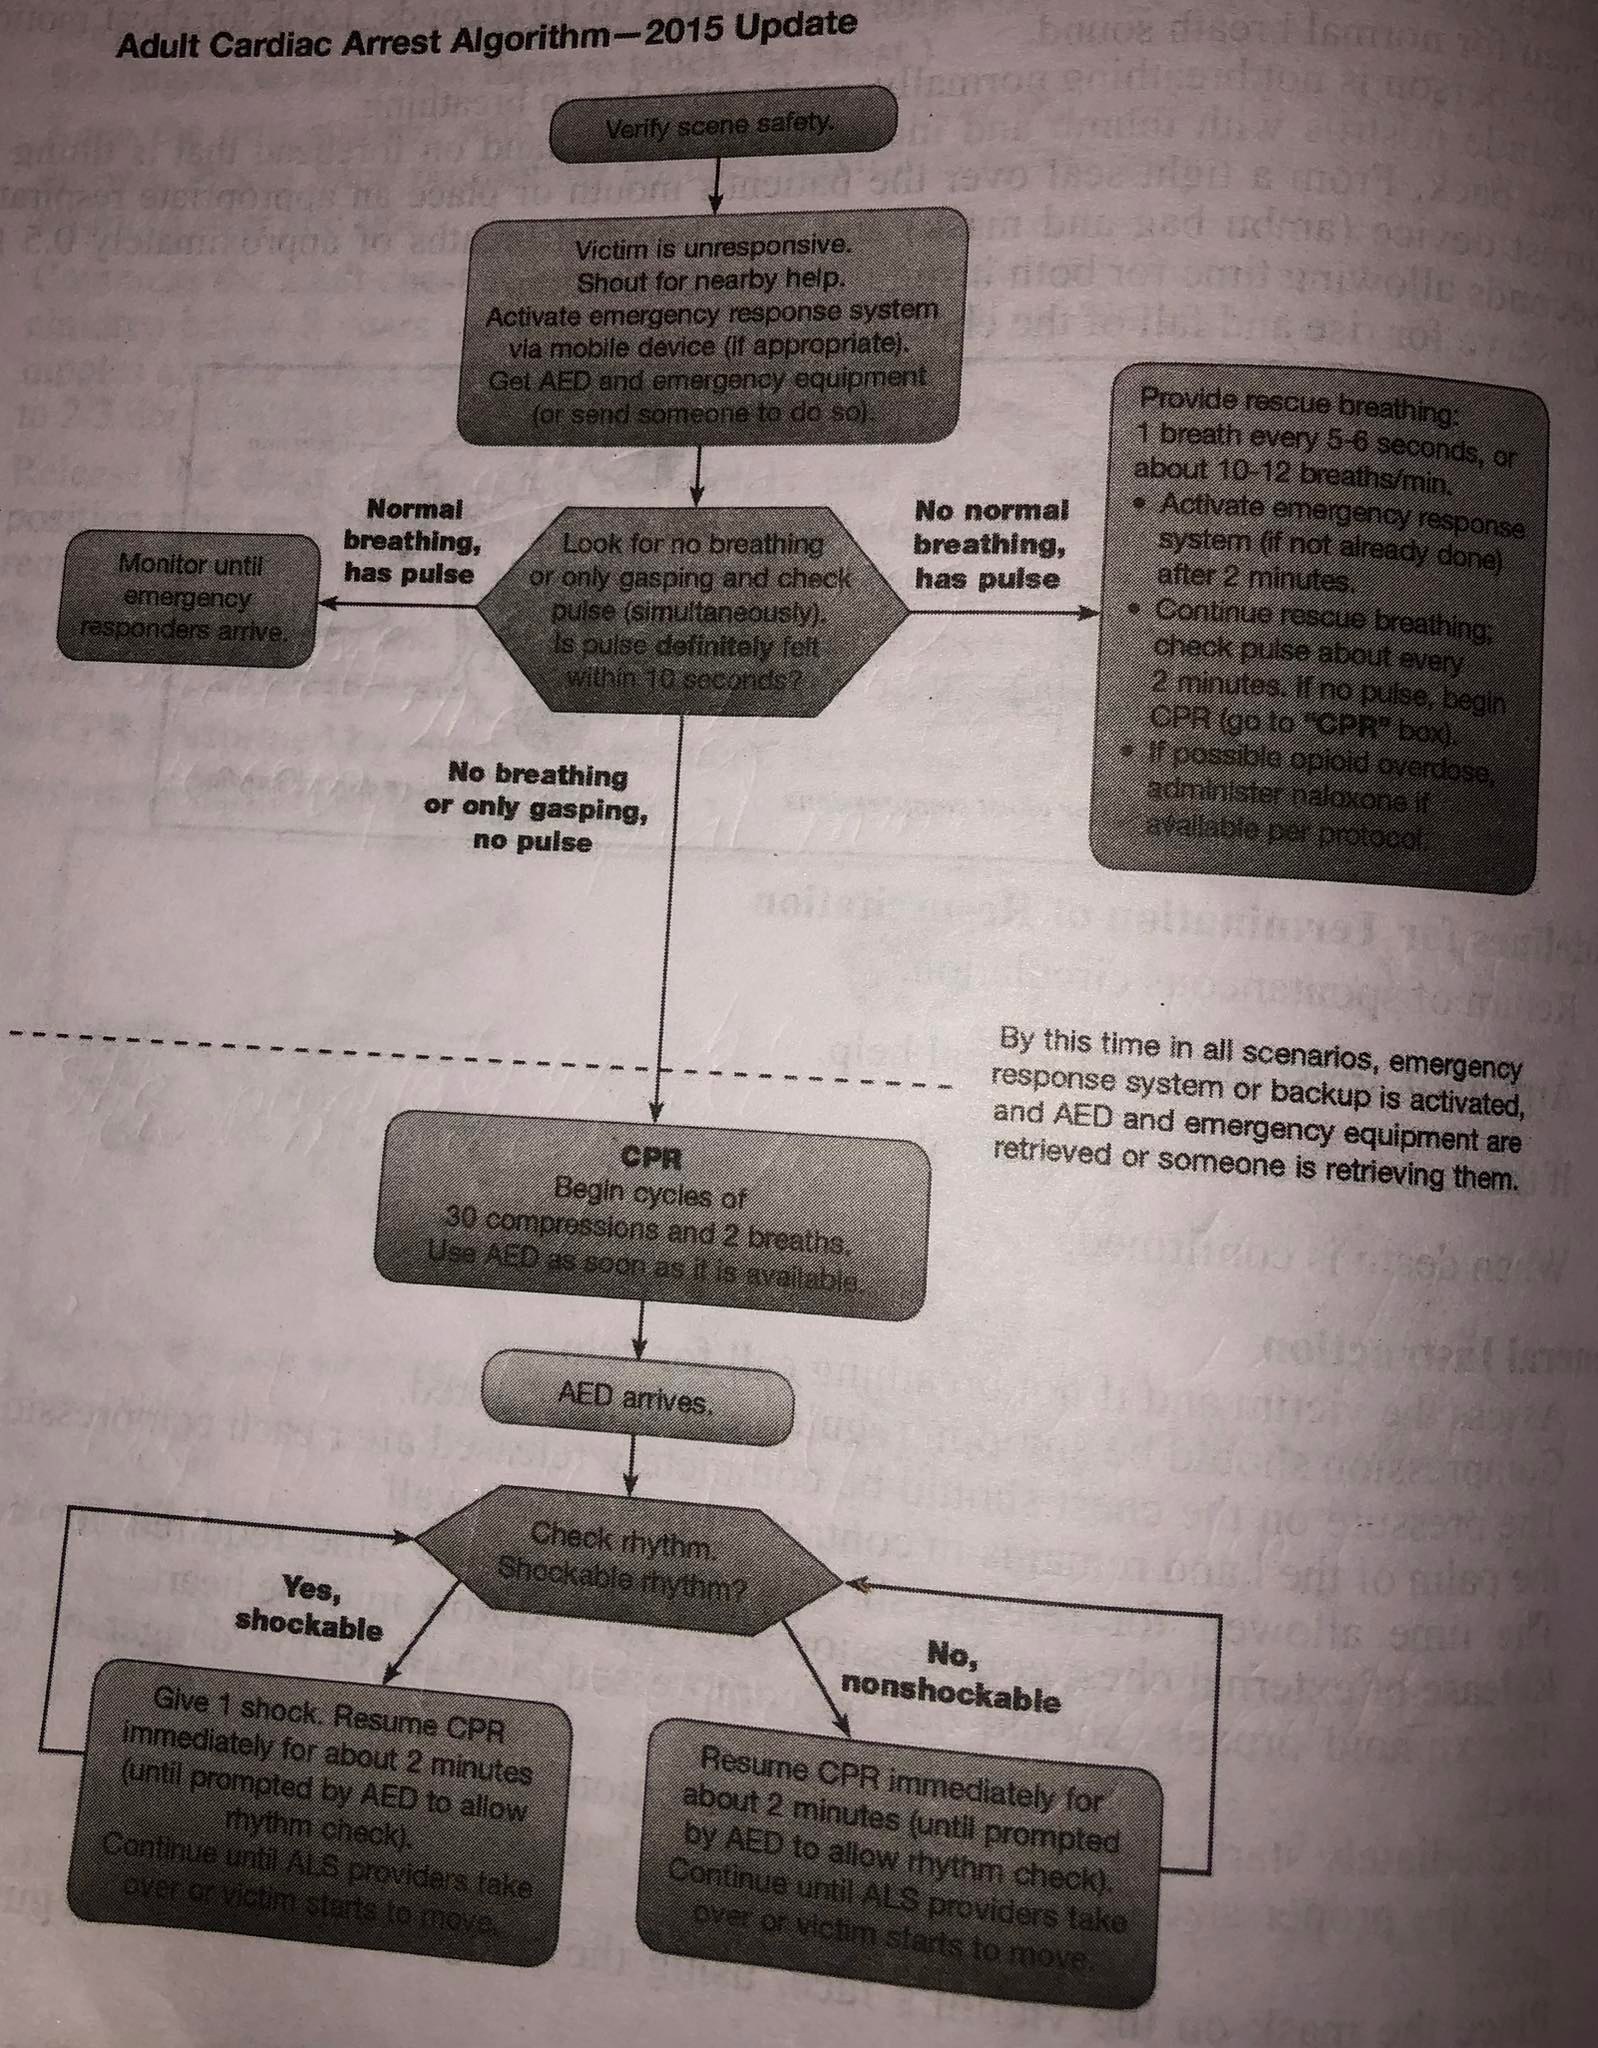
- Make sure the scene is safe for you and victim.
- Before begin CPR, determine the responsiveness.
- Tap or gently shakes his/her shoulder and ask loudly "Are you Ok".

- Determine pulselessness, check for carotid pulse on one side for not more than 5 seconds. Carotid pulse may persist when peripheral pulses are not palpable.
- Call for help in hospital setup
- If the person does not respond and you do not find pulse start chest compression.

Sequence for CPR:
- Chest Compression: Restore blood circulation with chest compression.
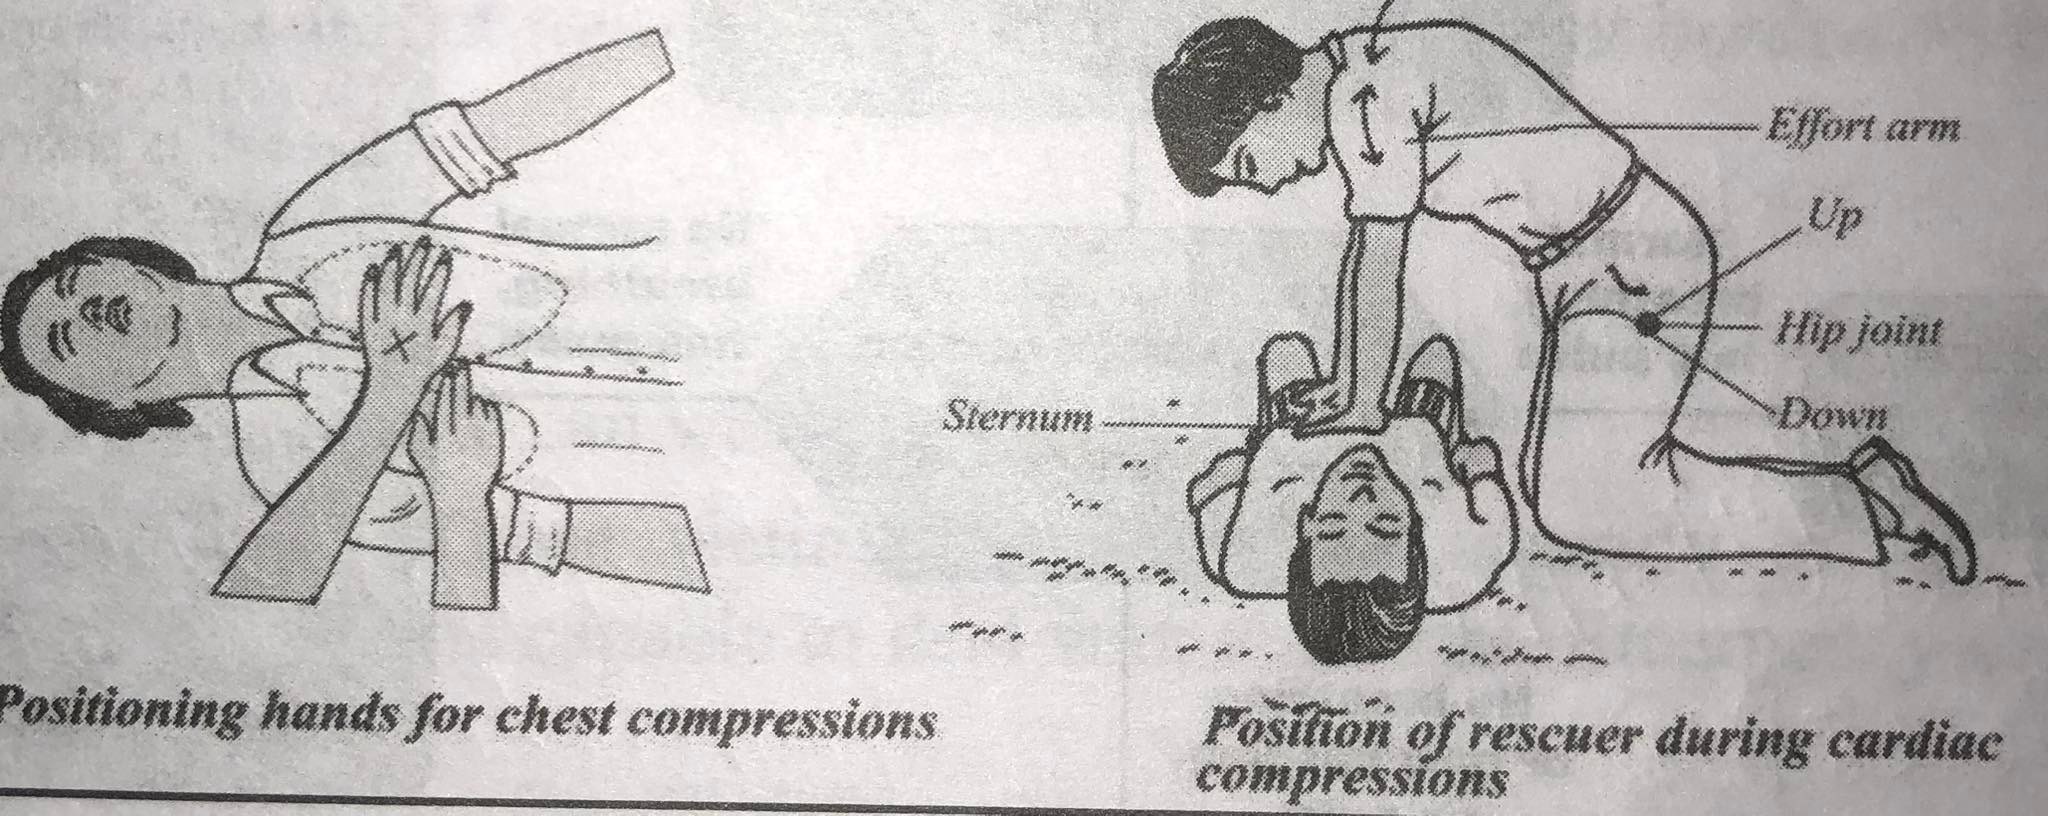
- Place victim on firm, flat surface. Position the arrest board underneath victim's chest. CPR is most easily and effectively performed by laying the patient supine on a relatively hard surface, which allows effective compression of the sternum.
- Kneel at victim's side, next to the patient's neck and shoulder.
- Put the heel of one hand on the center of the victim's chest on the lower half of the breast bone. Put the heel of your other hand on top of the 1st hand. (Using index finger of the hand, locate the lower rib margin and move the fingers up where the ribs connect to the sternum. Place the middle finger of this hand on the not notch and index finger next to it. Place the heel of the opposite hand next to the index finger on the sternum. Ensure that the long axis of the heel of hand is parallel to the long axis of the sternum. Extend or interlace the fingers, do not allow them to touch the chest.)
- Keep the arm straight with shoulders directly over the hands on the sternum and lock elbows. Proper hand positioning ensures maximum compression of the heart and prevents injury to liver and ribs.
- Compress the adult chest at least 5cm (2 inches) at the rate of at least 100 per minute. For children below 8 years use one hand and place hand on the breast bone jusust below the nipples and for infant use 2 fingers for chest compressions. Compress the chest about 1/3 to 2/3 depth of the chest.
- Release the chest compression completely and allow the chest to return to its normal position after each compression. The time allowed for release should be equal to the time required for compression. Do not lift hands off chest.
- Do 30 compressions and then perform two ventilations, re-evaluate the patient after four cycles. Use the mneumonic "1 and 2 and 3 ....." to keep rhythm and timing.
- For CPR performed by one or two rescuers, the compression rate is 100 per minute.
- The compression ventilation ratio is 30:2

- Open the airway.
- Open the victim's airway by using one of the following maneuvers.
- Head tilt chin lift maneuver- place one hand on the victim's forehead and apply firm backward pressure with the palm to tilt the head back. Then place the fingers of the other hand under the bony part of the lower jaw near the chin and lift up to bring the jaw forward.
- Jaw thrust maneuver- grasp the angles of the patient's lower jaw and lift with both hands, one on each side, displacing mandible forward.
- Place an airway if available.

- Breathing
- Check for normal breathing, taking no more than 5 to 10 seconds. Look for chest motion, listen for normal breath sound.
- If the person is not breathing normally, assist him/her in breathing.
- Occlude nostrils with thumb and index finger of the hand on forehead that is tilting the head back. From a tight seal over the patient's mouth or place an appropriate respiratory arrest device (ambu bag and mask) and give two full breaths of approximately 0.5 to 2 seconds allowing time for both inspiration and expiration.
- Observe for rise and fall of the chest.
Guidelines for Termination of Resuscitation
- Return of spontaneous circulation.
- Arrival of arrest team or medical help.
- If the rescuer becomes exhausted.
- When death is confirmed.
General Instruction
- Check the victim's breathing and call for assistance if necessary.
- Compression must be constant, smooth, and unbroken.
- Each compression should be followed by a full release of pressure on the chest, even though the palm of the hand is still in contact with the chest wall.
- The amount of time permitted for release should match the amount of time needed for compression.
- The external chest compression is relieved, allowing the heart to receive blood.
- The risk of lacerating the liver should prevent compression of the xiphoid process.
- Start cardiopulmonary resuscitation right away.
- Use the appropriate face mask size and connect the oxygen tubing when performing ambu bag resuscitation.
- Use the victim's nose bridge as a reference point to position the mask correctly on the victim's face.
- For adults, squeeze the ambu bag every five seconds. The compression rate should be between 70 and 80 per minute.
- Every few minutes, the pupils should also be examined. The pupils will start to narrow if CPR is successful.
- A perceptible carotid pulse and constricting pupils are signs of healthy circulation and oxygenated blood, respectively.
- All employees must be certified in CPR.
- At the beginning of every shift, all CPR equipment must be inspected.
- CPR supplies should always be available and in good working order.
- ber
- Chest compressions are started at a rate of 80 to 100 per minute while counting "one, two, three, four, and five."
- Unless the person is in a dangerous setting, do not relocate the victim while CPR is being performed.
Triage
Triage is the process of determining the priority of patients' treatments based on the severity of their condition. This provision helps patient treatment efficiently when resources insufficient for all to be treated immediately. Triage may result in determining the order and priority of emergency treatment, the order and priority of emergency transport, or the transport destination for the patient.
Purposes of Triage
- To identify quickly the victims needing immediate stabilization
- To set out priorities for the evacuation (migration) of victims
- To provide equitable and rational distribution of resources
- To assess the victims who are in life threatening situations and need immediate therapeutic interventions.
- To expedite the care of non-critical cases
- To improve the traffic flow through the emergency department
Function of Triage
Three major functions of triage are the following:
- Triage implies making the most efficient use of available resources.
- Triage separates out those who need rapid medical care to save life.
- By separating out the minor injuries, triage reduces the urgent burden on medical facilities and organizations.
Use of Triage on Disaster Site
The main aim of triage here is sort out the victim who needs to be evacuated promptly to health facilities from those victims who can wait.
A. Category (red color): Those victims must be sent urgently to the nearest properly equipped hospital, which is capable to deal with the cases. Emergency cases that must be dealt within an hour:
- Acute cardio-pulmonary insufficiency,
- Severe haemorrhage,
- Chest injury,
- Internal bleeding,
- Spleen rupture,
- Liver injury,
- Severe chest lesion,
- Severe cervico-maxillary lesion,
- State of shock,
- Burns covering over 20% of the body surface,
- Skull injury with coma.
Emergency cases that possibly can wait a few hours before operating:
- Ligature vascular injury,
- Abdominal wound,
- Open joint or bone injury,
- A multiple injury with risk of shock,
- Eye injuryns si to zomatipot bis at gahoftib olis,
- Extensive close fracture and dislocation,
- Less severe burns,
- Skull injury without coma.
Category (green color): This color code is given to the non-urgent cases. This group includes those victims who do not require major medical care as well as those serious cases with no chance of survival that it would be pointless to move.
Uses of Triage in Hospital
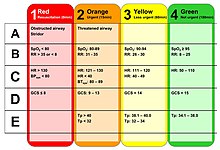
The usual color codes are red, green, yellow and black. Nevertheless, individual hospitals can have their own protocol for colour codes.
Red Colour: All life threatening patients who need immediate intervention
Yellow Colour: All patients for whom treatment can wait for within 5 to 60 min fall in this category. These patients require close monitoring and immediate intravenous infusion.
Green Colour: In this category, those patients whose treatment can be delayed for 4 to 6 hours, who need minor treatment, and who need no treatment are included.
Black Colour: No need for medical care, gasping case, brain and intestine hanging out, dead case.
Principle of Triage System
- Should be simple.
- Does not require advanced assessment skills.
- Does not rely on specific diagnosis.
- Should be easy to perform.
- Should provide for rapid and simple life-saving interventions.
- Should be easy to teach and learn.
Benefits of Triage
- Identifies patients who require rapid medical care to save life and limb.
- Provides rational distribution of casualties.
- By separating out the minor injuries, reduces the urgent burden on each hospital
General Triage Guidelines
The triage nurse should have rapid access or be in view of the registration and waiting areas at all times.
- Give the customer and their family a heartfelt, sympathetic welcome.
- Make quick visual evaluations.
- Record the evaluation.
- Utilizing the proper guidelines, prioritize the client.
- When required, transport the patient to the treatment location.
- Give the report to the emergency room doctor or treatment nurse, record the recipient, and then make your way back to the triage area.
- Inform the patient and their families about the delay.
- Reevaluate the waiting clients as needed.
Tell the client to alert the triage nurse if their condition changes.
First Aid Kit
A first aid kit is an assortment of tools and supplies for administering first aid. The contents of first aid kits can vary greatly depending on the knowledge and experience of the person putting it together, the various first aid requirements of the location where it might be used, and changes in legislation or regulation in a particular area.
The ISO graphic symbol for first aid (from ISO 7010), which is an equal white cross on a green background, should be used to identify first aid kits according to the international standard; however, many kits do not adhere to this standard, either because they were assembled by a single person or because they predate the standards.
Items Include the Following in first-aid kits:
- First-aid manual
- Sterile gauze pads of different sizes
- Adhesive tape
- Adhesive bandages in several sizes
- Elastic bandage
- A splint
- Antiseptic wipes
- Soap
- Antibiotic ointment
- Antiseptic solution (like hydrogen peroxide)
- Hydrocortisone cream (1%)
- Acetaminophen and ibuprofen
- Extra prescription medications (if the family is going on vacation)
- Tweezers
- Sharp scissors
- Safety pins
- Disposable instant cold packs
- Calamine lotion
- Alcohol wipes or ethyl alcohol
- Thermometer
- Tooth preservation kit
- Plastic non-latex gloves (at least 2 pairs)
- Flashlight and extra batteries
- Mouthpiece for administering CPR (can be obtained from your local Red Cross)
- List of emergency phone numbers
- Blankets (stored nearby 2)
Things to remember
© 2021 Saralmind. All Rights Reserved.
 Login with google